It can be difficult to figure out how to install The Sims 4 mods and custom content in-game. There's a lot to learn, especially if you're a beginner, from understanding where to put the stuff to finding out what to do if your CC doesn't function. This article will teach you how to download, install, and troubleshoot custom content and mods for The Sims 4!
Use the Table of Contents below to easily skip to the section you're interested in:
About Mods and Custom Content
Mods and Custom Content are hugely popular among Sims 4 players, but if you're new to the genre, you might be surprised at what awaits those who trawl the internet for the latest releases. There's a lot more free content to download than there is in the basic game and all game/stuff packs combined. I'll show you how to install CC and mods, explain what they are, and point you in the right place by providing links to sites where you can binge-download CC for your game in this guide.
What is CC?
Custom Content is simple in comparison to mods, however it might take just as long to create. CC is a collection of hair, textures, items, and apparel that you may download and use in your game. Everything from wall patterns to dressers, jewellery, and lovely flowing gowns may be found here. Because CC designers don't have to worry about system requirements like Maxis does, and because they have more time to devote to each component, they can create absolutely stunning improvements to the game that improve the graphics (particularly in the case of hair) and expand the player's options. CC is all about giving you more alternatives and better-looking gear.
What are Mods
Mods are, quite simply, changes to the Sims 4 game. Mods exist for almost every game that can be modified. They may improve an existing feature or offer wholly new ones. When mod creators share their content with the Sims community, they work hard to ensure that it is reliable and includes the functionality that is advertised. Some mods significantly improve gameplay, make modest changes to how things work (such as the frequency with which objects shatter), or simply fix something that upsets a large number of players. Mod creators are sometimes more in tune with the community's ideas for how things should operate than EA is, and they may patch flaws before EA does. Door locks, for example, were first provided as a mod and then as a patch.

Make Sure Your Game Is Patched
Before you begin downloading and installing custom content, make sure your Sims 4 game is up to date with the most recent patches.
Make sure you're connected to the internet, then launch Origin, navigate to The Sims 4 in your Game Library, select the Settings tab, and then select the Update Game button. If your game requires any updates, Origin will download and install them for you automatically. You'll get a notification if your game has already been fully updated.
Download an Extraction Tool
When you first start downloading CC, you'll see that many of the files have extensions like as .zip, .rar, and .7s. The custom content maker has compressed these files so that you can download and use them in your game. However, you can't simply drag and drop a.rar or.zip file into your Sims 4 game. As a result, you'll require software to extract these files.
To extract your files, I recommend using Winrar (which, despite its name, can be used on both Windows and Mac). Install it on your computer after you've done downloading it and move on to the next stage!
Turn on Mods in Your The Sims 4 Game
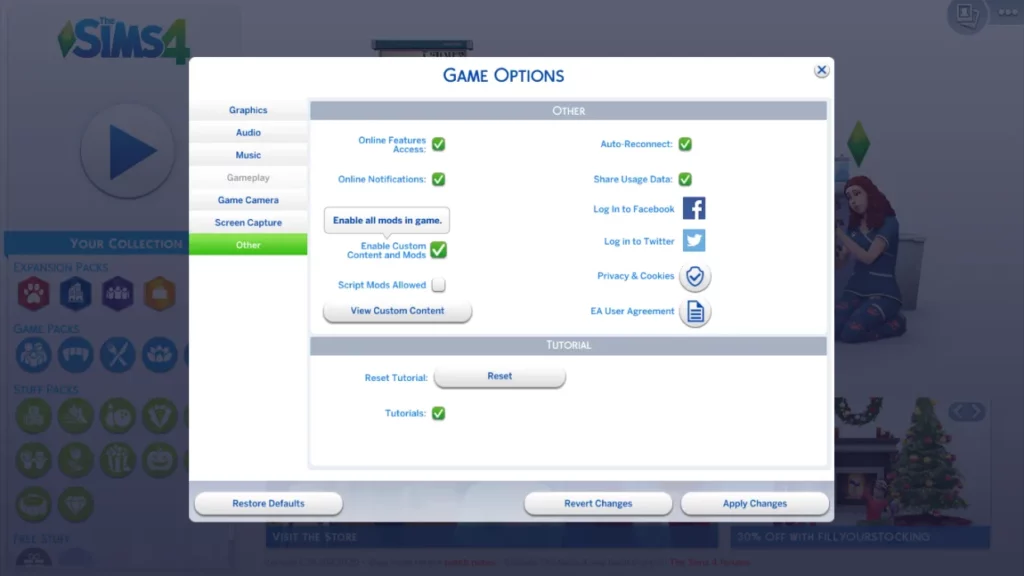
The Sims 4 includes a setting that disables mods by default. You'll need to start your Sims 4 game and turn mods on before you can start playing with custom content and mods (you'll need to do this after each patch, since the game choices revert back to mods being turned off).
Start the game, then go to Menu (the three buttons in the top right corner), Game Options, Other, and check the Enable Custom Content and Mods option. Then press the Apply Changes button to save your changes and resume the game. Your settings will be preserved the next time you load it up, and you'll be able to experiment with mods!
How to Install The Sims 4 Mods
It's time to download some custom content or modifications that you'd want to use in your game now that your game has been patched and you've installed a proper extraction program on your PC! If you don't already have one in mind, let's take a look of these mods right HERE
Instant Upgrade No Delay | The Sims 4
Your Handy trait for Instant Upgrades is available at all times with Instant Upgrade No…
A.I. Upscaled Food Mod | The Sims 4
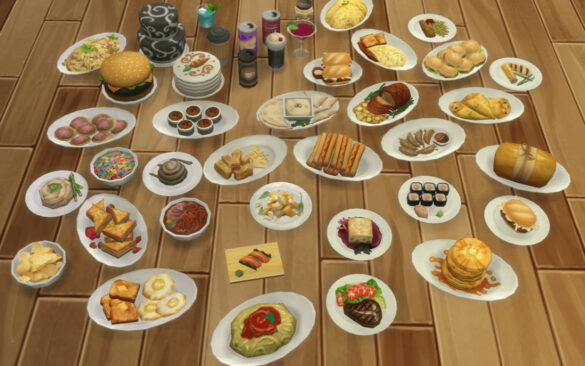
This A.I. Upscaled Food mod replaces the game's food textures (as well as pans, cutting…
Vampires Slower Thirst Decay | The Sims 4
Vampires Slower Thirst Decay mod cuts Vampire hunger decay in half. Creator: Foxx Vampires Slower…
Party Lounges | The Sims 4
Party Lounges mod helps NPC wear Party outfits at Lounges. Creator: Foxx Party Lounges Credits…
Once you've found the content you want to add to your game, click on the link below Download button on the website.

You'll notice the item downloading at the bottom of the screen if you're using Google Chrome as your browser. When it's finished downloading, right-click on the little arrow and select Go to Downloaded Folder from the menu. Your downloaded files will usually end up in your computer's Downloads folder.
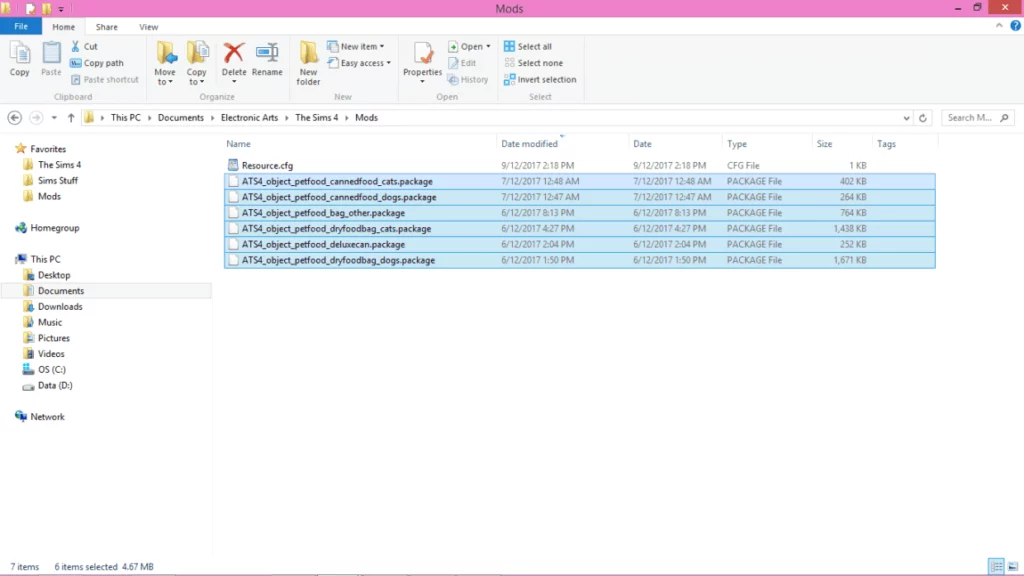
Step-by-step instruction
1. Right-click on the content you just downloaded after opening the Downloads folder. You'll see an icon that looks like a stack of books if you're using WinRar. Select “Extract to (mod name)” from the drop-down menu. After that, the file will be extracted into a folder.
2. Check the contents of the folder by opening it. Normally, you'll only come across files that finish in .package.
Mods and custom content for The Sims 4 are saved in this file type. You might also come across some other file kinds. Images of their CC or .txt (“read me“) files are included by certain creators. These can be safely thrown away. If you see file extensions like .ts4script, .bpi, .blueprint, or .trayitem, those are Sims 4 file types, and I'll explain how to install them below.
Do not delete them!
3. The.package files in the folder should be highlighted (draw a box around them with your cursor) and then right-clicked and selected “cut.” You'll now need to find your Sims 4 Mods folder.
4. Go to Documents > Electronic Arts > The Sims 4 > Mods to do so. Once you're in that folder, right-click somewhere and choose “Paste.” The.package files you've downloaded will then display!
5. When you start your game, the mod or CC you installed should be there and ready to use!
Installing Script Mods
Script mods are modifications and additions to the game's scripting. Script mods include things like custom careers, custom animations/interactions, and well-known mods like McCommand Center and WickedWhims.
- Script mods are installed in a similar manner to the other mods described above. The primary difference is that the file extension will be .ts4script.
- You'll still place these modules in your Documents > Electronic Arts > The Sims 4 > Mods folder, but you'll also need to make sure that Script Mods is enabled in your game settings.
- To do so, go to Menu (the three buttons in the upper right corner), Game Options, Other, and tick the Script Mods Allowed box. A notice concerning script mods will appear. Click OK, then Apply Changes before restarting the game.
- The next time you play, your script mod will be active!
Troubleshooting
It should all work correctly if you installed the CC or mod exactly as indicated above. If it does not appear in your game or does not work for any reason, you may need to perform some troubleshooting. Here's a list of things to look into and attempt if you're having trouble:
- Make sure you have custom content and script mods enabled in your game, as specified above.
- Go into Buy Mode if you can't find an item in Buy Mode (here is where your custom objects go) (by clicking on the tools icon or F2). Select Material from the Filter Items panel, then tick the Custom Content option to display all of your custom content. The stuff you downloaded should be visible there.
- Click the View Custom Content button in the Options menu to double-check that your custom content is installed (go to Options > Other and click the View Custom Content button). You should see the content you've downloaded listed among the files listed there.
- Open your Mods folder and double-check that the CC is in the right place. In your modifications folder, only files ending in.package or.ts4script should be present. If the files have a.zip,.rar, or other file extension, they will not work in your game!
- Go into Origin and repair your game while you're online. You may do this by going to your library, selecting The Sims 4, then clicking on Settings, then Repair Game (please note that you must not be playing the game when you select this option). The game will then automatically restore itself, essentially reinstalling all of the files required to operate The Sims 4. It won't harm your save game, and I've used it in the past to repair malfunctioning CC (especially issues with script mods).

- Delete your.cache files and see if it helps. Go to the Documents > Electronics Arts > The Sims 4 folder to do so. This directory's localthumbscache.package file can be removed. You'll also notice a cache folder and a cachestr folder. Everything in these folders can be deleted, but not the folder itself. If the onlinethumbnailcache folder is present, you can safely delete it. Cache files can be deleted to allow the game to “correct” itself in some ways, and should be used as a last resort before restoring the entire game.
- Reinstall the mod and begin again. Downloads can become corrupted during the download process, so just in case, delete the files you first downloaded, redownload them, and place them in your modifications folder to see whether they work.
- Check to see if the mod is up to date. Almost every time a patch for The Sims 4 is released, it breaks a number of mods. The mod's designer, in most cases, will be aware of this and will update his or her website to inform players. If required, go back to the page where you obtained the mod and delete and reinstall the latest version. SimsVIP and other Sims websites keep track of incompatible mods and CC following fixes.
- Keep in mind that game mods and custom content are only compatible with the original Sims 4 game. There is no assurance that they will work with pirated versions of the game, so if a mod isn't working, it could be because you have one. The only way to fix this is to buy a copy of The Sims 4 from Origin, where you can be sure it will be patched on a regular basis and will work with all mods and custom content.
If all of the troubleshooting approaches have failed and the mod/custom content still won't work, the best thing to do is contact the original creator and inform them of your problem. Give them a specific example of what's going on in the game (for example, “Whenever I set down the couch I downloaded, an error notice appears that says “script call failed”). Hopefully, they'll respond with an updated version of the article or a solution to the problem. If this is not the case, you may just need to remove the file from your game.
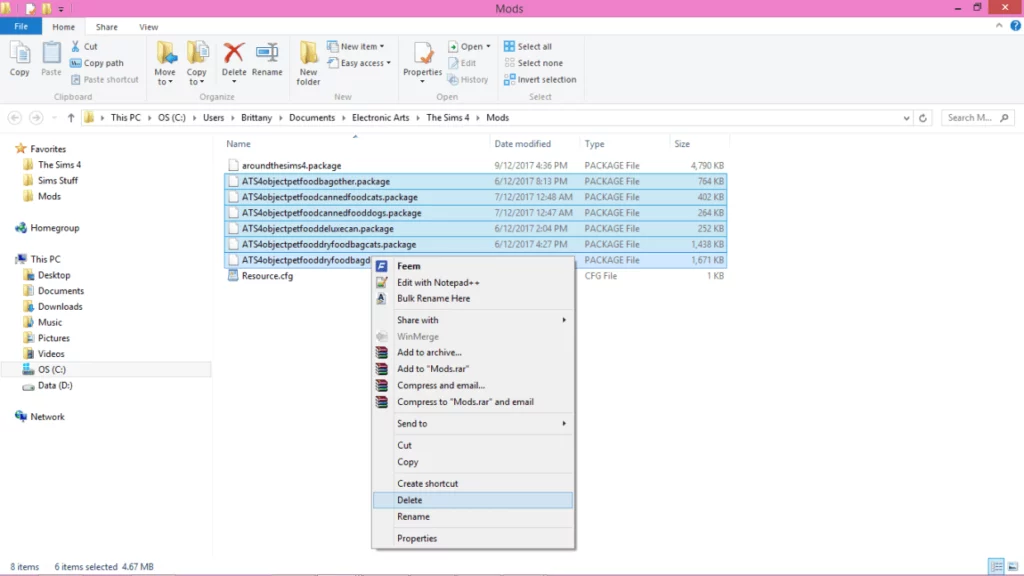
How to Uninstall
It's as simple as going to your Mods folder and deleting them to uninstall CC and Mods. Right-click on the file you wish to delete, then select Delete. That custom content or mod will no longer be in your game the next time you start it up.
Broken Content
Hopefully, this will never happen to you, however while modding your game, you run the danger of encountering faulty or corrupt custom content or mods. If you have problems with your game freezing, crashing, or generating “LastException” files when playing after installing CC or mods, the mod or CC you installed is most likely corrupted.
Backup Your Saves
Back up your save game before you start uninstalling and testing mods.
Copy the folder labelled “Saves” from your Sims 4 folder by right-clicking on it. Copy your Saves folder to another location on your computer, such as your desktop. That way, if something goes wrong while testing, you'll have a “safe” version of your saved game.
Test Your Game Without Any Mods
Right-click on the Mods folder in your Documents folder. Copy it to your Desktop once again. Delete the copy in your Sims 4 folder after you're confident you have a copy of your Mods folder on your Desktop. Play for a few minutes after restarting your game. If your game doesn't crash or give you errors, you know it's a problem with one of your Mods. If it doesn't, you'll have to go out and fix the problem (and the issue is something within your Sims 4 game itself).
Delete Script Mods
Script mods are the most likely to create serious game play faults if they're faulty or out of date because they do the most changes in the game. Remove any script mods from your Sims 4 folder (custom careers, WickedWhims, McCommand Centre, etc.) and test your game without them. If the errors have vanished, one of your script mods is malfunctioning and needs to be repaired or updated.
Delete Recently Added Mods
If the problem persists, identifying the problematic mod is as simple as removing the most recent version you downloaded. Repaste your Mods folder into your Sims 4 folder, then organize your files by Last Modified Date. Remove the most recent mod/CC from your game and restart it. Play for a few minutes to test whether it works. If that's the case, you've discovered the problematic mod.

The 50/50 Method
This is a really straightforward procedure. Make a new folder on your desktop called “Test Mods” or anything along those lines. Copy and paste half of the objects from your Mods folder into this folder. Check your game to determine if the issue still exists. If not, you can be sure the problematic content is in the other set of mods. If this is the case, the issue mod is still active in your game, and you'll have to redo the process.
This can be laborious and time-consuming, but when you have a large collection of stuff, it's sometimes the best method to find troublesome mods.
If you're having trouble understanding how the 50/50 method works, view this flowchart from The Sims Wiki.
Manage Your Mods Folder!
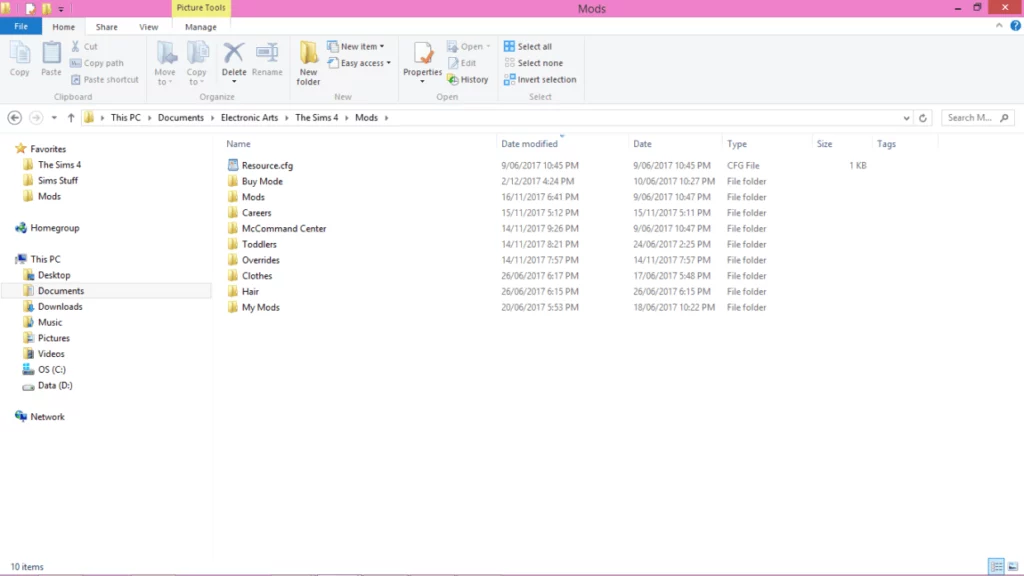
You can organize your Mods folder in a variety of ways. As you can see in the image above, I prefer to do mine in categories. This doesn't do much during gameplay, but it does allow me to quickly locate stuff in my directories, install new content, and delete or update existing content.
You are free to organize your Mods folder in any way that makes sense to you! You can search by creator, category (such as shoes, clothing, and hair), or functionality (buy mode, script mods, etc.).
It's a good idea to keep your Mods folder organized so you can install and uninstall Mods more easily when playing The Sims 4.
Rename Files to Speed Up Your Game
I believe it was in The Sims 2 that users noticed that having files in your mods folder with special characters in their names (like @ $ #, etc.) would cause the game's loading screen to slow down. This still happens in The Sims 4, thus renaming any files and removing any special characters from the title is the quickest method to minimize high loading times when downloading mods.
Simply right-click the file and choose rename, then erase any special characters or spaces. Make sure the extension type isn't changed (it should still end in .package).
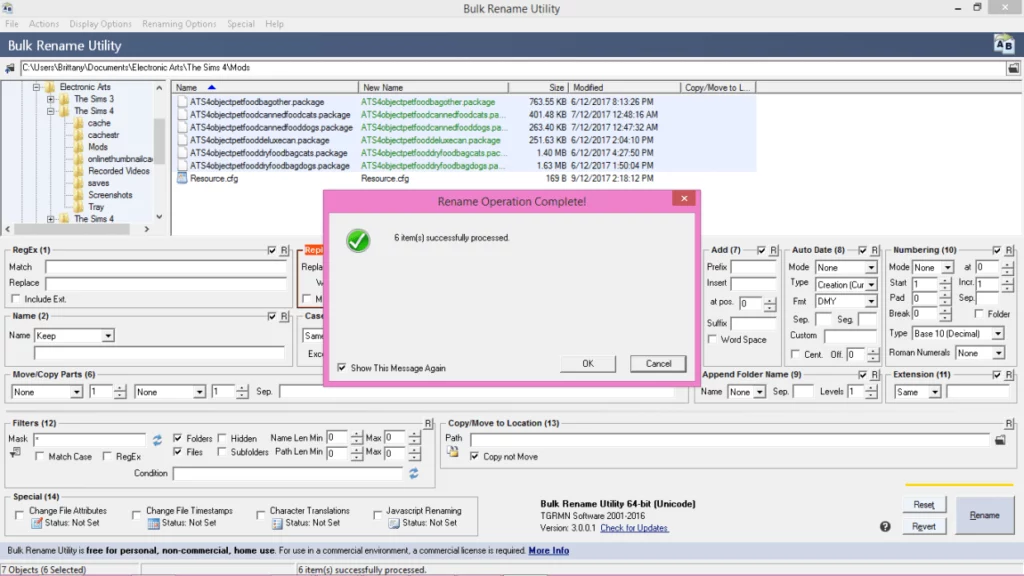
If you have too many files to rename manually, there's a terrific tool called Bulk Rename Utility that may help you accomplish it quickly.
How to Use the Bulk Rename Utility
Download and install the free program from here.
- After you've completed installing it, right-click on the Mods folder in your Documents > Electronic Arts > Sims 4 folder. Select Bulk Rename Here from the drop-down menu.
- When the software loads, you'll notice your Mods folder in the left-hand pane. Select everything in the folder, then go to the Replace (3) section, which is immediately below the Mods window. Enter your cursor in the Replace box and press the space bar once. Any spaces in the file names will be removed.
- Go to the area labeled Remove (5). Select “Sym.” from the drop-down menu. Any symbols will be removed as a result of this.
- The Mods window will show you how the files will look after you've finished; all spaces and special characters should be removed. You've successfully renamed all of your CC/Mods by pressing the Rename button in the bottom right-hand corner and checking all of the caution boxes.
- If you have sub-folders, you'll have to click into each one separately to rename the files. Carry on with the same procedure as before.
Merge Custom Content for Faster Loading
This method is a little hazardous, and I only recommend it to seasoned Sims modders. Merging files can help you save time loading them, but it can also cause problems because there's no way to “un-merge” them once they've been merged, and if one of the files in your combined file fails, you'll have to delete everything else merged with it to remove the problematic file.
Merging files, on the other hand, can be a wonderful method to speed up your game and organize it even more; for example, you can merge files by creator, date, item type (i.e., all your custom outfits, all your custom hair, etc.) or whatever you like.
Warning: DO NOT MERGE .ts4script, tray files or anything but basic .package files together!
How to Use The Sims 4 Studio to Merge Files
- To begin, create a free Sims 4 Studio account and download the Sims 4 Studio application. The Sims 4 Studio is a fan-made program for both Windows and Mac that is available for free.
- Open The Sims 4 Studio and go to Tools > Merge Packages after you've downloaded and installed it on your computer.
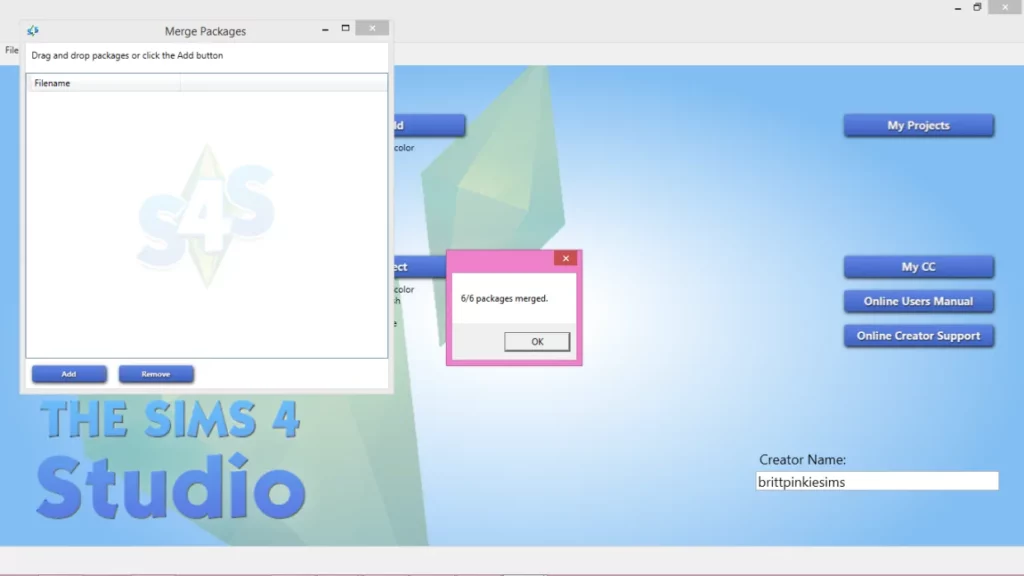
- There will be a window that will open. Then, in the window, click the Add button and navigate to your Mods folder. Select open after selecting all of the mods you want to combine. Select Merge from the drop-down menu. Your new merged.package file will be prompted to be renamed by the application. Select Save after giving it a unique name.
- A pop-up will display once the status bar has finished (it will take longer if you have a lot of files to merge), stating that the packages have been successfully merged.
- When you're finished, the software will open up to your Mods folder, where you'll see both your newly merged and un-merged.package files. You can safely remove the old files, or you can copy and paste them somewhere else as a backup (for example, create an Unmerged Mods folder on your desktop and save them there), which will make it easier if you ever need to delete one of them.
- If you need to delete a file that you've merged, simply delete the individual file you want to get rid of, and delete the merged.package file from your Mods folder if you've retained the un-merged files duplicated somewhere. Return to Sims 4 Studio and merge the remaining files as described above, then save the new merged.package file to your Mods folder.

Read more: Resident Evil: Village wins Steam 2021 Game of the Year
source https://nowmods.com/how-to-install-the-sims-4-mods/




Comments
Post a Comment